


How to Fix Discord Error: 'Installation Has Failed'
🕤 11 Jan 2025 Read more

Have you ever noticed that windows 11 sometimes takes more resources than it needs to? What could be the reason for this? While an important application, it’s not a resource-intensive one. I mean, it’s just an audio service. How bad can it get, right? Let’s take a look at the problem and try as many possible methods to fix it as we can.
Windows Audio Service controls all the audio devices on your computer. For any Windows operating system program using sound, it is essential to have this app.
Windows Audio Service is an important component of Audio that assists in the management of all audio devices on your computer. When you turn on your audio devices, the audio service is activated by default.
Some examples of such applications using this service are Discord, Zoom, Browser, and so on.
This application isn’t malware. It’s a genuine piece of software that comes with windows. The problem is usually caused by simple bugs. But other than that, there can be multiple causes. Some reasons are:
Some audio processing effects are more intensive than others. Playing audio from software always costs some processing power. No matter what device you play it through, the CPU is being used. So, naturally, using some of these applications will load the CPU by a big margin. The audio interface uses the CPU to communicate with the device. And when complex audio processing is taking place, it’s natural to see a spike in CPU usage.
Having the latest updated drivers is the best way to go about using your PC. Outdated drivers can cause a lot of problems and hassles. However, a lot of us fail to keep on top of driver updates. And that reminds me, I have some drivers to update.
Some audio effects tend to overload the CPU. This is because some audio effects are complex. And they need to process a huge bulk of signals or go about processing with more complex methods. This can overwhelm the CPU module too.
While a legit application, who’s to say it can’t be affected by malware? Windows is very vulnerable to malware when there are no added layers of security. So this can make it look like Audio Services have been taking more CPU usage. But really, it’s just the malware disguised as Windows Audio Services.
Some of the fixes for audio services taking high CPU resources are as follows:
It's possible that restarting the audio service will get things back to normal, at which point the audio may function normally again.
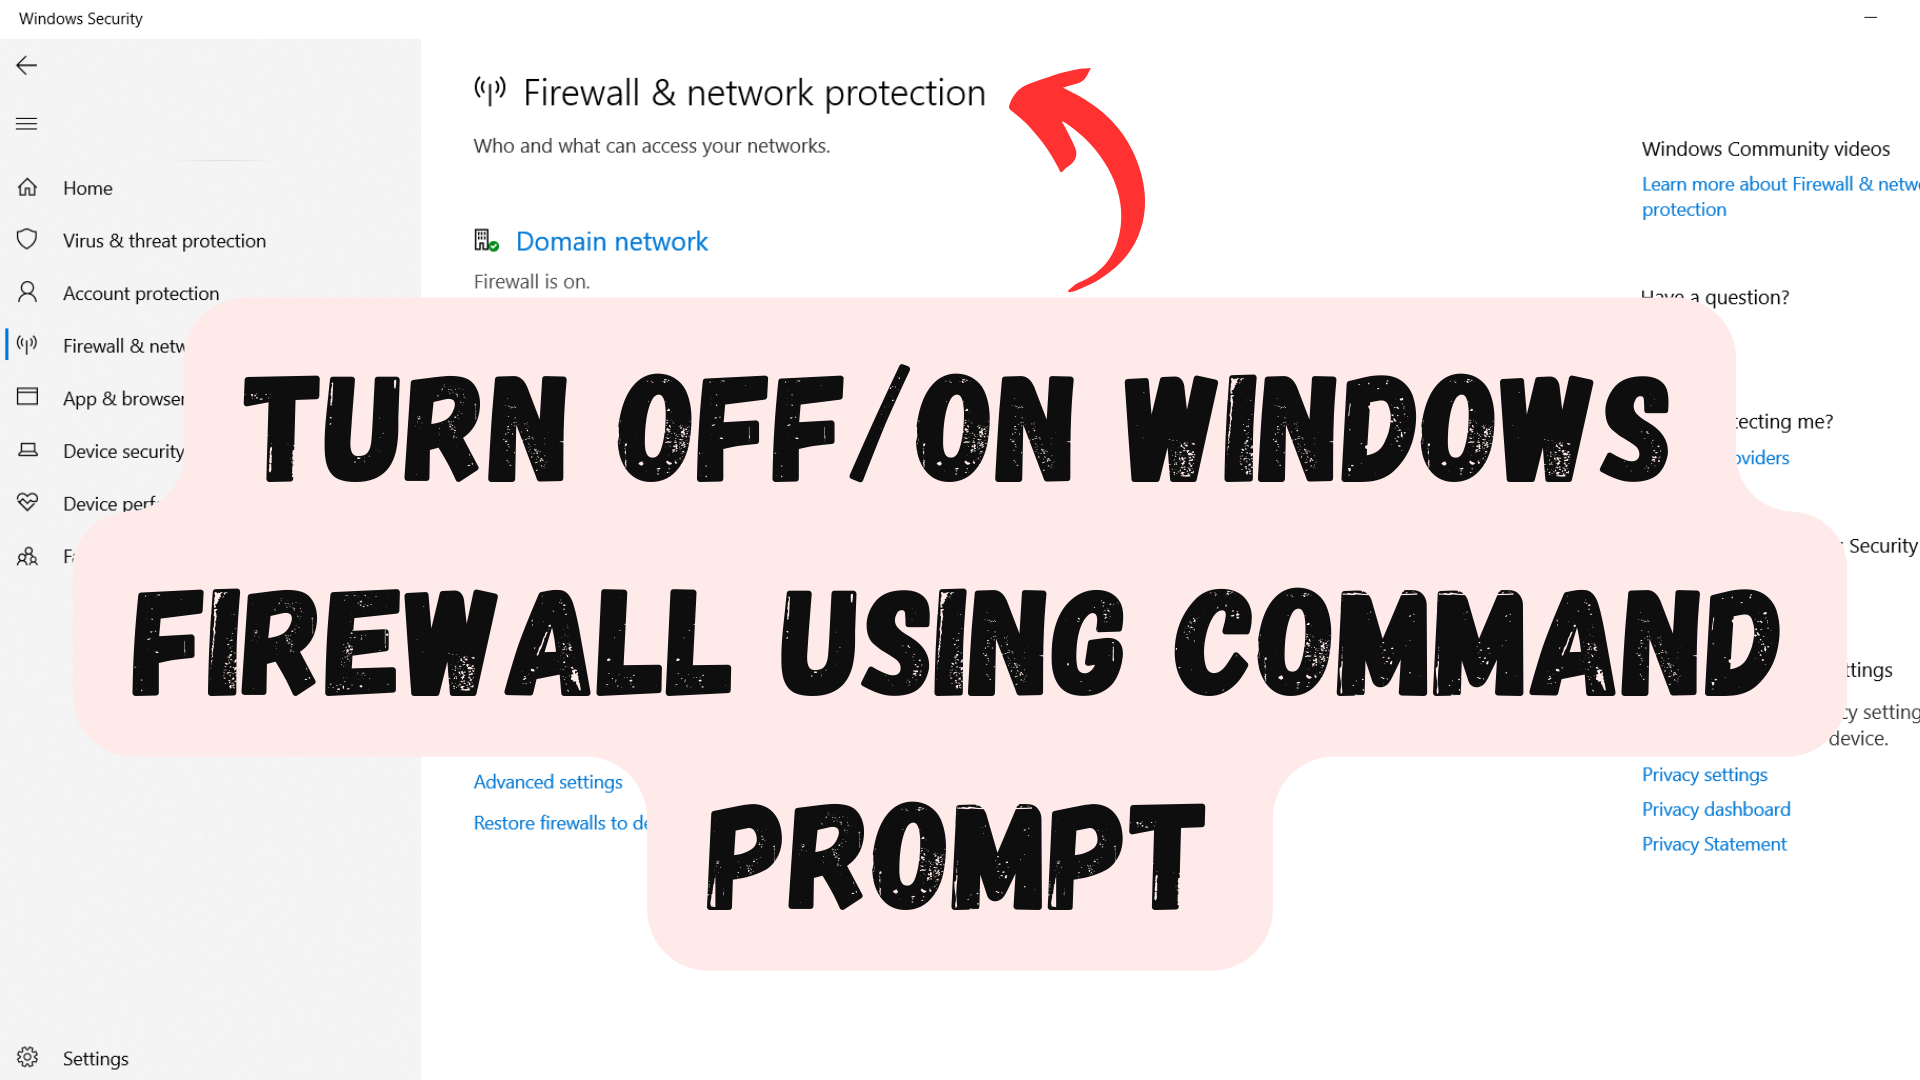
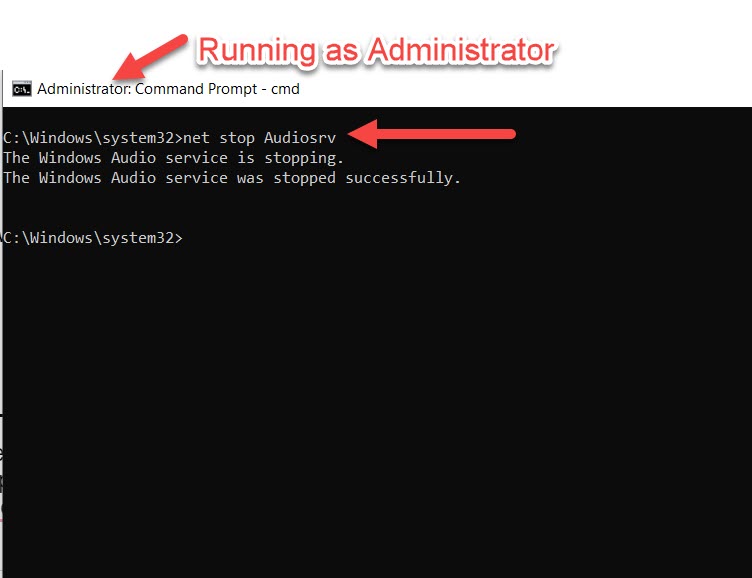
Here are the steps for restarting Windows Audio Service.
Open Command Prompt with Administrative Privilege.
Then type the below command and press Enter
net stop Audiosrv
This will stop Windows Audio Service.
Now next type the below command to again start Windows Audio Service.
net start Audiosrv
Usually, the simplest solutions solve the biggest of problems. So, we may not have to go too far to solve the problem. Just restarting the PC solves it and the problem doesn’t persist. Restarting solves the problem because it gives you a clean slate to work with. But when you have the computer running for a long time, you open some apps. You might close most of them, but others just keep running for eternity. Restarting closes those apps and solves the problems.
While a rare problem, it is possible that the drivers might be messing with the system. This usually happens because we don’t update them frequently. Updating drivers is a relatively simple process that can be done by going to your OEM’s site. For me, I take the following route:
Sometimes, simply restarting the Windows Audio service solves the problem. To understand this fix, we need to understand that some applications can have bugs.
Malware apps hide from the user using other applications. This is done to save themselves from gullible users. I am yet to see a virus named “Virus”. This might be the case here. i.e. Some malware using Audio Services as a host. Without proper security, Windows is really vulnerable to problems like this. Therefore, it is a good idea to install some antivirus applications like Malwarebytes.
When we think of the audio sample rate, we can think of them like Video Resolution but for sounds. Having a higher audio sample rate is really to hear. But, much like the video resolution, it takes up more system resources. Here is how we can lower this feature.
Disabling audio effects is something that can solve the problem in a matter of minutes. These effects use the PC to process sound output in real time. This can cause issues when some complex sound processing task is running. Here is a guide on how to disable this feature:
Windows has a feature built into it. Because of this feature, it will detect when you’re on a call and decrease the sound of other applications. This is usually done to help you focus on the call but it is also a problematic feature. It uses some CPU resources. Therefore, disabling it might be a good idea. In order to disable this feature, follow the steps given below:
While an underrated tool, the troubleshooter is a good and useful one. If you want to figure out what the problem is and how to solve it, you can run the troubleshooter. It diagnoses the problems present in the PC and helps you solve them with ease. This is how you can run the troubleshooter to cater to this specific problem.


.png)